

Introduction
Are you familiar with Gel X nails? They’re quite the trend and can give your nails a really cool look! But it’s essential to learn how to properly remove them. If you want to maintain the health and beauty of your nails, follow these easy steps on how to remove Gel X nails. Let’s start!
Gel X nails are a unique manicure that lasts a long time and looks fantastic. But when your nails start growing underneath the gel, it’s time to remove them safely. This guide will help you do it step by step so your nails stay healthy and beautiful.
Now, let’s learn how to remove gel x nails safely!
Preparing for Removal
Okay, now it’s time to get everything ready before we start taking off the Gel X nails. You’ll need a few things to do this safely. Here’s what you’ll need:
- Nail File: This is like a little tool that helps us shape our nails and make them smooth.
- Acetone: It’s a special liquid that helps take off the Gel X nails gently.
- Cotton Balls: These are soft balls made of cotton that we’ll use with the acetone.
- Aluminum Foil: It’s like a shiny wrap that we’ll use to cover our nails.
- Cuticle Pusher: This is a tiny tool to help us gently push back our cuticles.
- Nourishing Nail Oil: It’s a special oil that makes our nails and the skin around them healthy and soft
Now, find a nice spot with good light and air where you can work comfortably. This will make it much easier for you to do everything. Let’s get everything ready so we can start!
Wondering how to remove Gel X nails safely? Let’s find out.
Step-by-Step Guide for Gel X Nail Removal
Step 1: File the Top Layer
First, grab your nail file, which is like a little tool for shaping nails. Remove the shiny top layer of the Gel X nails with a file. This helps the special liquid, called acetone, to work better later on.
Step 2: Soak the Nails
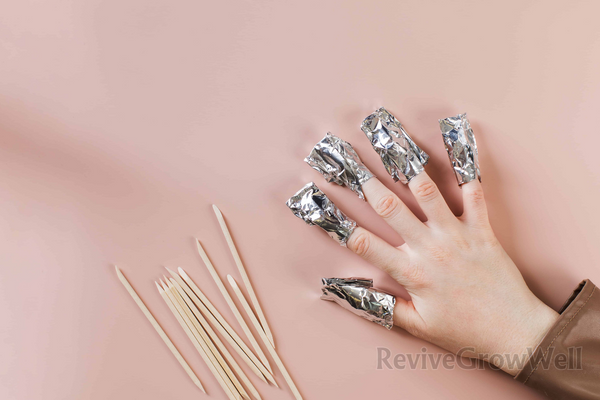
Now, get some cotton balls and soak them in acetone. Put a soaked cotton ball on each nail, and then cover your fingertips with aluminum foil. This keeps everything in place. Let your nails soak like this for about 15 to 20 minutes. The acetone softens the gel during this time.
Step 3: Gently Remove Softened Gel
After the soaking time, take off the aluminum foil and cotton balls. The gel should be softer now. Use a cuticle pusher, a tiny tool, to gently push off the softened gel. Remember, be gentle to keep your natural nails safe.
Step 4: Avoid Excessive Force
If the gel doesn’t come off easily, don’t worry. Don’t force it! Instead, put the soaked cotton balls back on your nails and wait a few more minutes. It’s better to be patient and gentle to avoid any harm to your nails.
Step 5: Nourish and Care for Your Nails
Finally, when all the gel is removed, wash your hands well. Now, it’s time to give some love to your nails! Use a special oil or cream made for nails to keep them healthy and hydrated. This will make your nails look and feel great!
And there you have it! Following these steps will help you safely remove Gel X nails and keep your natural nails in top shape. Remember, take your time and be gentle with your nails, and they will thank you with their beautiful shine!
Tips for a Smooth Removal Process
Removing Gel X nails can be easy if you follow these helpful tips:
1. Be Patient and Gentle:
Taking off Gel X nails needs some patience. Don’t rush or pull them off quickly because that can harm your nails. Be gentle and take your time to keep your nails safe and healthy.
2. Avoid Using Metal Tools:
Using metal tools like metal nail files can be too rough on your nails. It might scratch or damage them. Instead, use a soft cuticle pusher, which is more gentle and safe.
3. Moisturize Your Hands and Nails Regularly:
Keeping your hands and nails moisturized is essential. It helps to make them look and feel better. So, regularly apply lotion or special nail oil to keep your nails healthy and beautiful.
Remember, by being patient, using gentle tools, and keeping your nails moisturized, you’ll have a smooth and safe Gel X nail removal process!
Potential Risks and Safety Precautions
Removing Gel X nails is essential for keeping your natural nails healthy. But there are some things to be careful about:
1. Weakened or Damaged Nails:
If you don’t properly remove the Gel X nails, your natural nails can become weak or damaged. So, it’s important to follow the right steps and be gentle.
2. Seek Professional Help if Needed:
It’s OK to seek assistance during the removal procedure if you’re having trouble doing so on your own. You can visit a professional who knows how to do it safely.
By being careful and seeking help when needed, you can avoid these risks and keep your nails in great shape! Your safety is the top priority!
Alternatives to Gel X Nails
If you want to try something different instead of Gel X nails, there are other cool options for you! Let’s check them out:
- Traditional Gel Polish:
Just like Gel X nails, you can go for regular gel polish. It lasts longer than regular nail polish and gives your nails a beautiful shine.
- Dip Powder Nails:
Dip powder nails are another fun choice. It involves dipping your nails into colored powder, creating a unique and long-lasting look.
- Regular Nail Polish:
Good old regular nail polish is always an option too! It’s easy to apply and comes in a wide range of colors.
Remember to Give Your Nails a Break:
Regardless of your choice, make sure to give your nails some time to breathe between applications. This means letting your nails go natural for a while without any products on them. It helps to keep your nails strong and healthy.
So, go ahead and try out these alternatives! There’s a whole world of nail designs waiting for you! Have fun with your beautiful nails!
Conclusion
In the end, taking off Gel X nails the right way is super important for keeping your natural nails looking and feeling great. You’ve learned the step-by-step guide to safely remove them, and that’s fantastic! Just remember to be patient, gentle, and careful while doing it.
Following these tips will help you keep your nails healthy and beautiful, so you can enjoy stunning nail looks without any worries. Take care of your nails, and they’ll thank you with their shine and charm! Happy nail caring!
FAQs About How To Remove Gel X Nails
How to Remove Gel X Nails: A Step-by-Step Guide
Q 1. How long does the Gel X nail removal process take?
Removing Gel X nails might take some time, usually around 30 to 40 minutes. The precise time depends on the gel thickness and nail quality. It’s essential to be patient and not rush during the removal process.
Taking the time to do it carefully ensures that your natural nails stay healthy and happy. So, relax and take your time – your nails will thank you for it!
Q 2. Can I reuse the aluminum foil during the soaking process?
Using fresh aluminum foil each time you soak your nails is the way to go! This helps make sure the removal process works well. When you wrap your nails in fresh foil, the acetone can do its magic properly, softening the gel.
It’s like giving your nails a little spa treatment! So remember, always use new foil for each soaking session to get the best results and have beautiful nails. Keep it fresh, keep it effective!
Q 3. Can I remove Gel X nails without acetone?
When it comes to removing gel nails, acetone is the best choice! It’s like a special superpower that can take off the gel quickly and safely. Other things might also not work, so you should only use acetone for the best results.
It’s like having the perfect tool for the job! So, remember to use acetone, and you can remove gel nails like a pro! Stick with what works best, and you’ll have fantastic-looking nails soon!
Q 4. Is it safe to remove Gel X nails at home?
Absolutely! You can totally remove Gel X nails safely right at home! Follow the step-by-step guide we discussed earlier, and be careful with your nails. Taking the proper precautions means being gentle and patient during the removal process.
With a little care and attention, you can do it like a pro and keep your natural nails happy and healthy. You should try it out for yourself! You’ve got this! Safe and stunning nails are waiting for you!
Q 5. How often should I apply nourishing nail oil after removal?
After removing Gel X nails, it’s a great idea to use nourishing nail oil every day, especially in the days right after the removal. This special oil is like a treat for your nails! It helps to bring back moisture and keep your nails healthy.
Just like we drink water to stay hydrated, our nails need some love too! So, apply the nail oil regularly, and your nails will feel super happy and look fantastic! Remember, a little love and care go a long way in keeping your nails shining bright!
With a little care and attention, you can do it like a pro and keep your natural nails happy and healthy. You should try it out for yourself! You’ve got this! Safe and stunning nails are waiting for you!


1 thought on “How to Remove Gel X Nails: A Step-by-Step Guide”
I appreciate your website, however I think you might check the spelling of a few of your postings. Even though I find it quite difficult to tell the truth because so many of them have spelling errors, I will most certainly return.